Hmmmmmmmm
Looking through this thread, I see I am missing my front Sway Bar installation, the integration of my front bumper with my shock hoops, and a new under the bellhousing frame cross member. Looking through my photos I don't have any record of these mods. I'm sure I took the pictures, they must not be filed correctly. Looking through the photos I do have, my best estimate is that the front Sway Bar was installed between March and June of 2009, and the other stuff was done between May 2008 and March 2009

I'm gonna have to dig around for those photos.... Until then, here are two photos that I can use to describe what I did.
Sometime in mid to late 2008: Integrated front bumper with Shock hoops and installed a cross member beneath my bellhousingI'll start with the following image. Please ignore the sway bar for now which is discussed further below
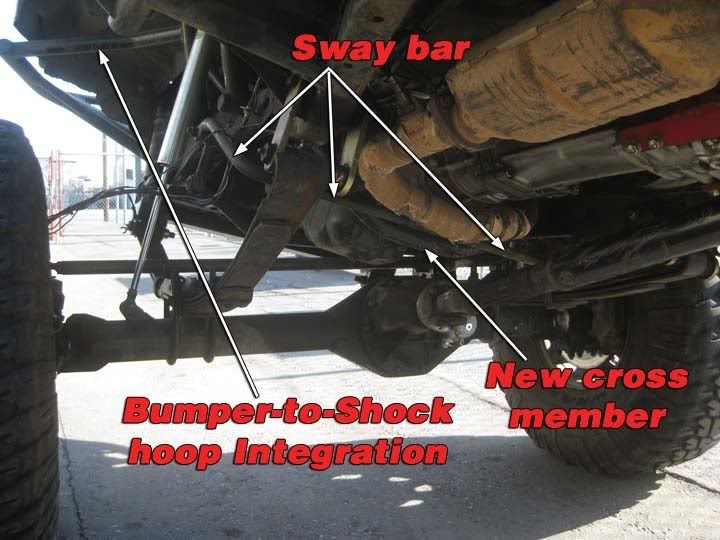
What's going on?
Bumper-to-Shock hoop Integration: The end of my Marlin Crawler bumper deflects a bit, as expected since its the furthest point away from any solid mount. I never had any intent to remove the bumper so I had it hard-welded in place during installation. We were able to cross-weld it to the cab's front body mount, and over time these welds have had to be re-welded because they are taking the load of supporting the outer most end of the bumper.
The solution? Connect the bumper to the shock hoops. Now the ends of the bumper are VERY rigid and the shock hoops gained additional support as well. Moreover, the bar adds an upper tire limit when fully compressed in a full-lock turn. Now I don't need to do any trimming and I don't have any fear of my drag link interfering with my oil pan. It really worked out great.
New Cross Member: Toyota Rock Crawlers should be aware of the cracking cab issue that occurs along the inner fender wall above the front tire in the engine compartment. In examining the cause for this, I've concluded that it's due to a lack of frame support around the 1) heaviest and 2) torque developing object: The engine. If you think about it, what cross members do you have on your own truck? You have (1) your front spring hanger .... and then nothing until (2) your transfer case cross member...
...What's worse are people like me who do not run a stock style cross member like a BudBuilt, who instead have a highly custom transfer case cross member that is raised within the frame rails that cause no expense to ground clearance. Enter your side-to-drive train side crossmember. These cross members are not mounted to the frame, have rubber bushings that either divide the transfer case from each side cross member bracket OR separate the crossmember from the frame itself (such as a Front Range Off Road crossmember), and as a result provide no structural support. Indeed even the FROR crossmember does not offer support for the frame as it is isolated with two large bushings.
The end result for my truck is that it has (1) a front spring hanger cross member and then (2) the factory horse-collar cross member that is all the way back above the rear drive line that holds the front of the fuel tank!! What?! This is a huge void in frame support right where it's needed the most! All that weight and torque of the drive train and the body is the primary object keeping the two frame rails aligned.
I therefore installed a cross member beneath my bell housing hoping it will better support my frame rails to help reduce the amount of flex and stress on the body. I believe it has been a good addition to the truck (other than weight its not as if adding additional support(s) throughout could hurt in a practical sense), HOWEVER, since I've installed it I have lowered my truck about 2 inches as discussed herein this thread above. THEREFORE, I now have an issue of my front drive line's yoke (at the pinion flange) contacting this cross member. When it was installed this was never an issue, not only for the former increased ride height but also because I had those tall 14" shocks that kept up travel in check. So while I've been making changes to lower my center of gravity and increase my articulation, I've encountered this issue that in late 2009 remains unresolved.
Sometime in Spring 2009: Installed Front SwaybarWhat I did here was I measured the distance between my front leaf springs, and then went to the wrecking yard to find a suitable bar. I planned to mount the links directly to my U-Bolt flip plates, which would give me plus-or-minus ~5inches to play with in finding a candidate.
There were a lot of bars that would work but many of them had bends to clear drive train components, but I specifically wanted a straight bar. The match was found using a first generation 4WD Ford Explorer. The bar wasn't as large a diameter as other bars I had found, but I figured it would work well...........AND OHHH MAN yes it does!!
HUGE difference with the sway bar on. Considering how loose I've made my suspension by removing leafs and using the rear pivot block, and my mountain road driving style as derived from my Supercharged MR2, I don't know how I ever lived without this.
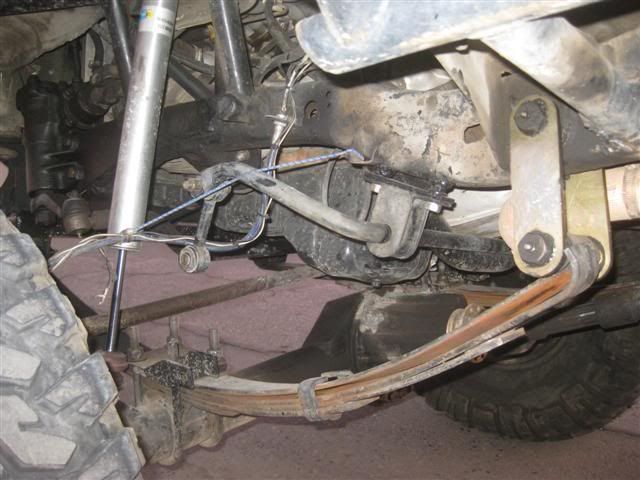
Here is a good picture of it disconnected. The mount at the u-bolt flip plate is elementary, and all I did to mount the sway bar to the frame was make a flat plate and weld on some nuts to the frame. Done.
To disconnect the sway bar, I drilled a small pilot hole in the end link's lower bolts connecting to the flip plate where a removable pin is used to hold the bolt in place. When I hit the trail, all I have to do is pull the pin, then remove the bolt, repeat on the other side, and then lift the sway bar + end links up to the frame rail and hold them in place with a small bungee cord.
This entire modification is so simple its stupid

The truck responds so much sooner to any steering input and its very stable in a high speed corner. I highly recommend doing this to any Toyota Rock Crawler. I think the sway bar only cost like $20 from the wrecking yard, something like that. Cheap, easy to install, and increases occupant safety. What else could ya ask-
That's it for now. I had a fun time posting some updates! I'll see if I can continue with some more updates over the next few weeks


Regards,
BigMike


