Author Topic: 2nd generation rear seat into a 1st generation 4Runner  (Read 6222 times)

0 Members and 1 Guest are viewing this topic.

cbeers

  • Offline Rock Master
  • ***
  • Turtle Points: 4347
  • Posts: 309
  • Member since Jan '14
  • Crawling with Marlin
    • View Profile
2nd generation rear seat into a 1st generation 4Runner
« on: Jun 06, 2014, 12:45:37 PM »
Hey everyone,

Hope this is OK to post this here.  Not much of a project really but this seemed like the most appropriate place to post. 

I have been researching this subject for a while now and found bits and pieces of info scattered about.  A lot of the threads tended to be vague or just ended with things like "my buddy has that setup, let me ask him and get back to you" only nothing was ever posted.

Sooo, here I go.  Hoping this helps others who are thinking about this swap.

First thing is yes, the rear seat physically fits in the space.  However, it is not an exact fit and it does require some fabrication work.  Unless someone posts up how to do it without.
The best thread I found was posted on pirate and actually showed a solution for the upper seat back latch.  Not sure of the correct term.  Here is the link:  http://www.pirate4x4.com/forum/toyota-truck-4runner/1100262-first-gen-4runner-rear-seat-differences.html

I chose a different approach as far as material, but the idea is the same. 

First up was removing the old rear seat.  Mine was the worst one available it seems.  "Gate latch" mechanism, poor bench seat that was not going to cut it for my kids back there (ages 3 and 5) since the rear of the bench seat could be moved by hand back and forth quite a bit.  So out it came

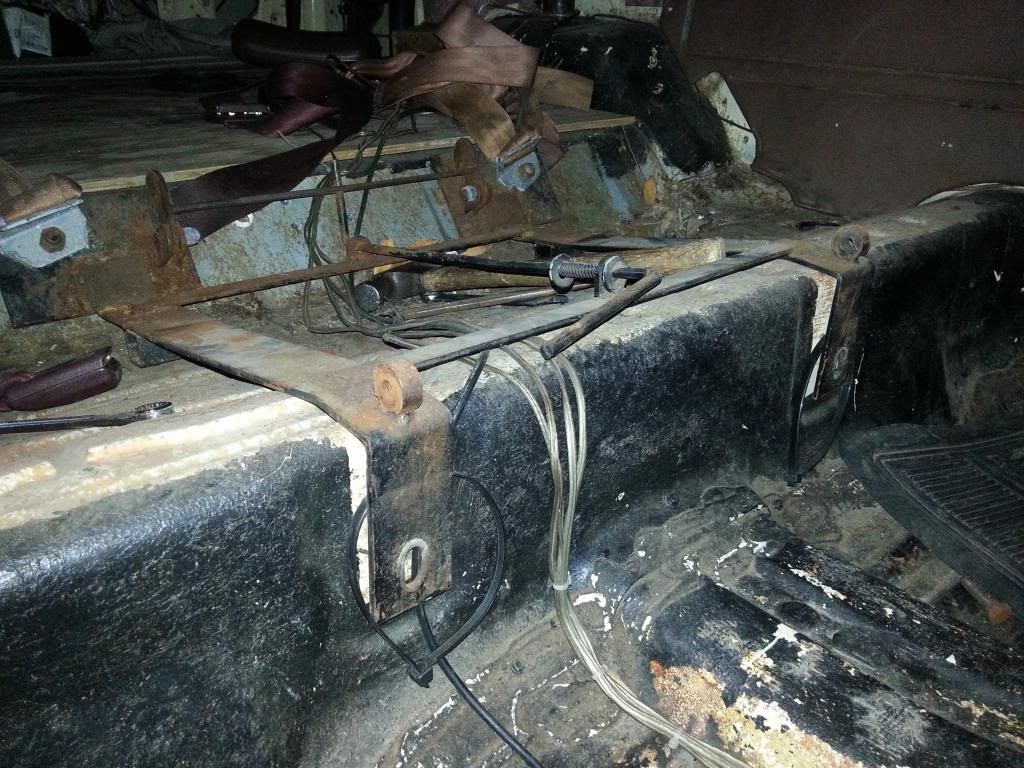
1st issue is the bottom brackets for the 2nd gen seat don't align with the threaded holes for the 1st gen, no problem, drill new holes and run bolts through.  done.

Next issue was that the bottom brackets on each side of the seat did not align with the threaded holes on the body.  Can't exactly drill new holes here so I oblonged (is that a word?) the bracket holes.  Done.

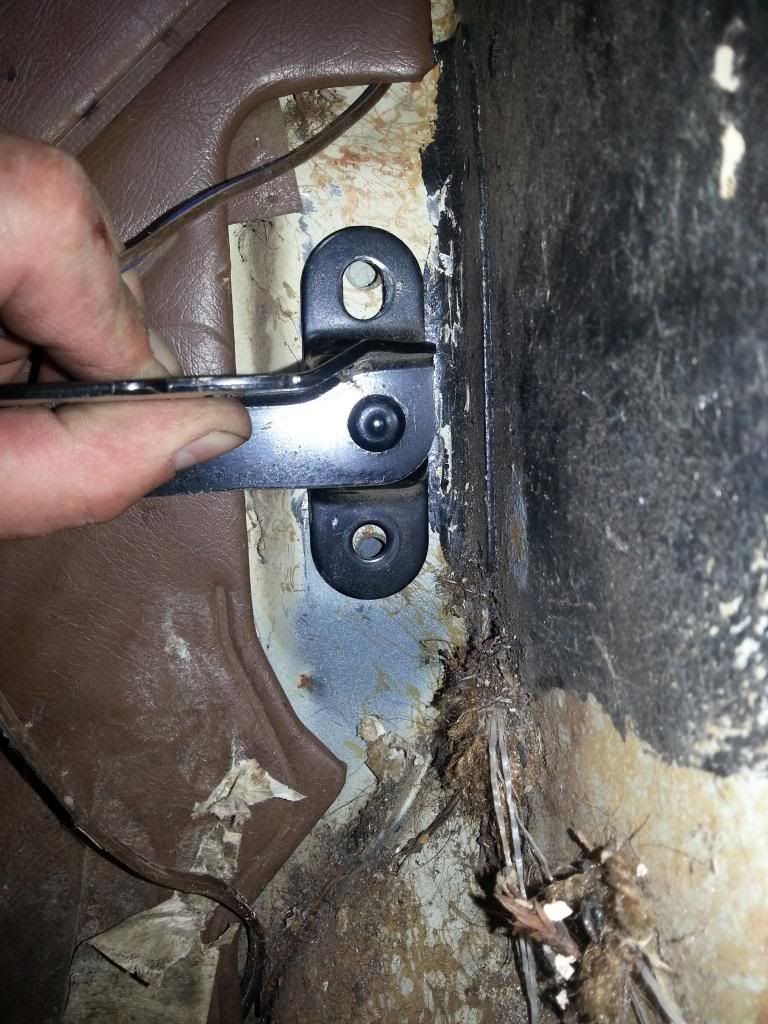
Then it was time for the upper seat back latch.  First step was to remove the rear panels.  I removed them all for easier access.  I located the two threaded holes shown in the thread above and started mocking up a bracket using some scrap steel.  I am no fabricator and this process took me a while and a lot of in and out of the truck.  I found removing the front passenger seat was time well spent.  All 3 minutes of it ;)
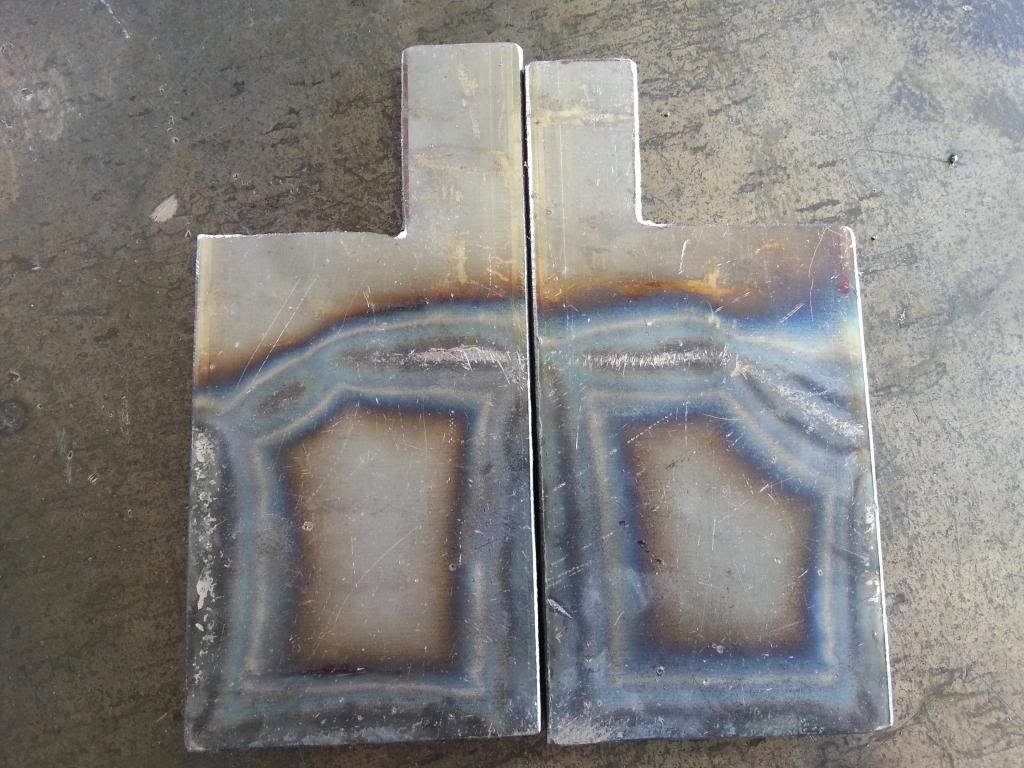
I finally got a design that would work and cut out 3/16" flat stock I got from the local hardware store.  Cut out four pieces and welded them up.  I had to put the smaller piece on to achieve the proper spacing, otherwise the upper seat back latch would not engage properly or even at all.  This is what I came up with.  Again I am just learning how to weld (115V/125A mig with flux wire) so go easy on me :beerchug:


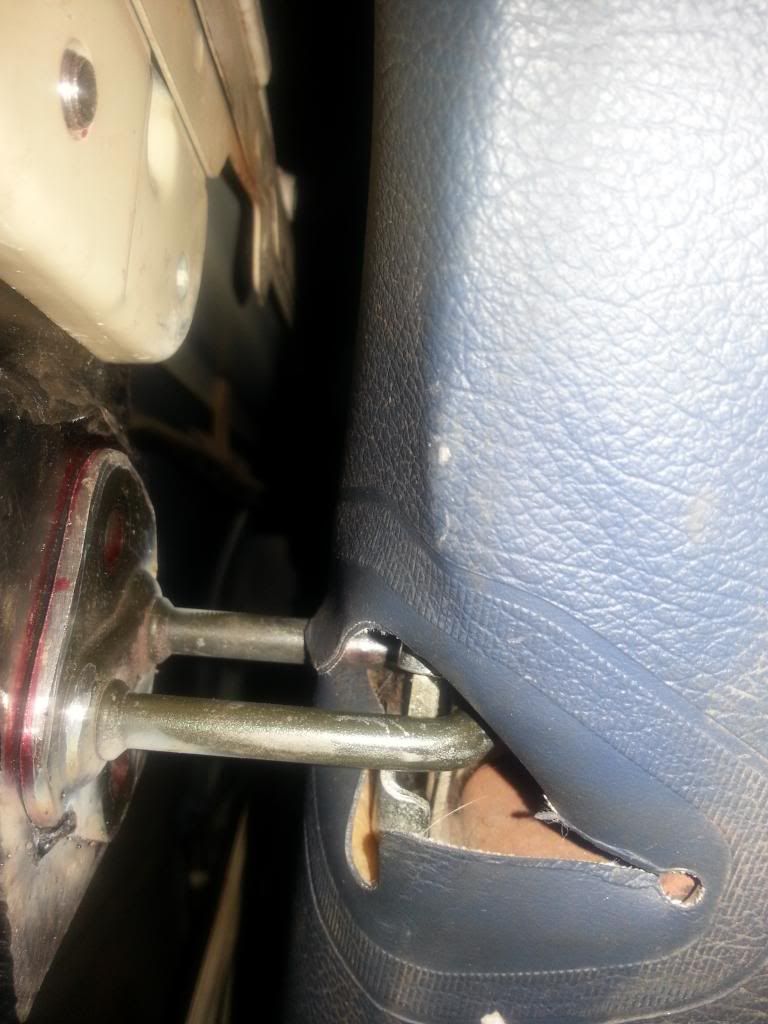
Once I had my brackets made I drilled a hole for the upper bolt and put it in the truck.  Then put the seat back latch into the receiver on the seat back and put it into the position I wanted and traced it out on the bracket.  Drilled the second hole and test fit again with the latch tacked onto the bracket.


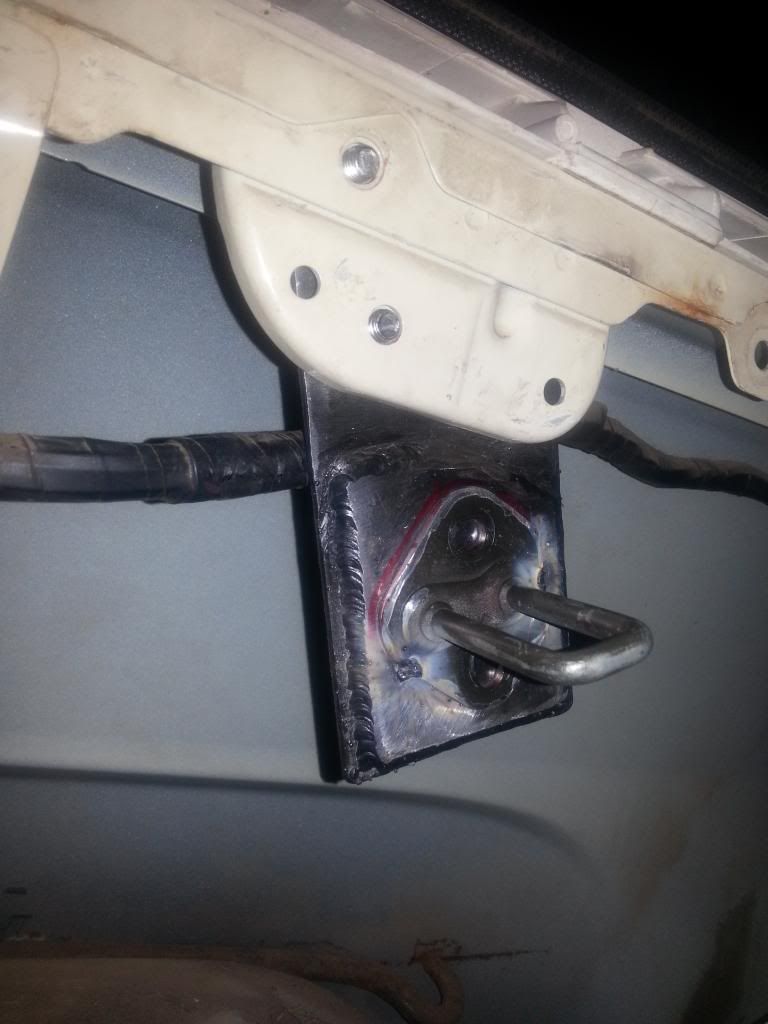
It was perfect so I took it back out, burned it in and painted it just for the sake of it. 
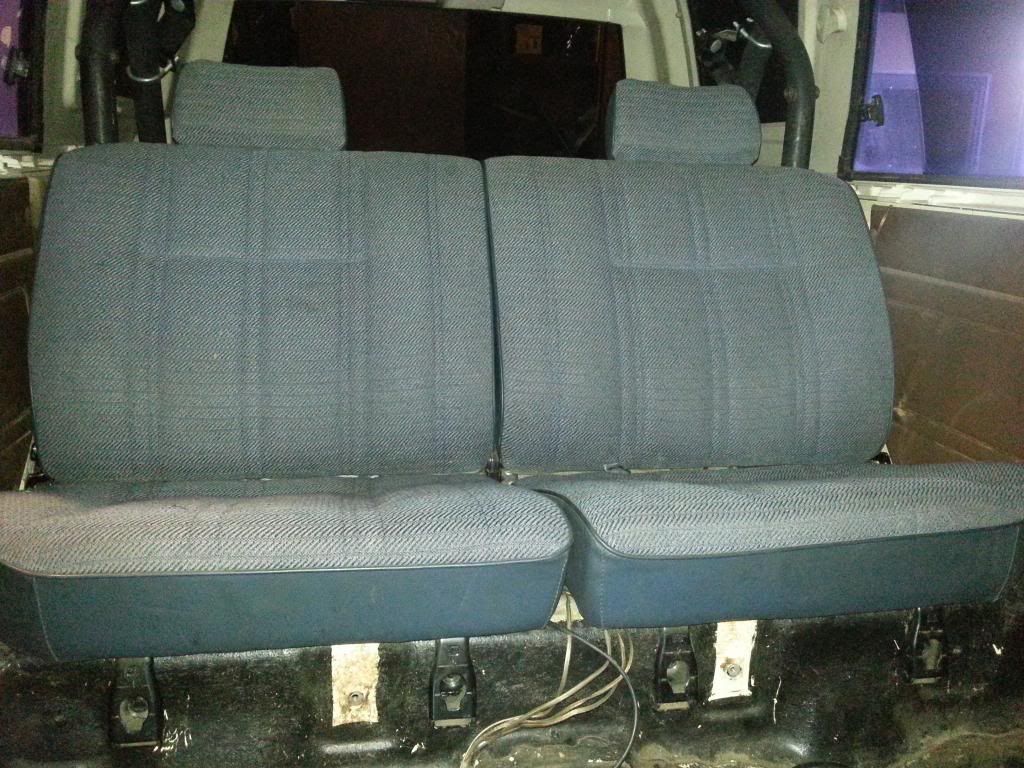
Last step was to cut the side panels to accept the latch and it was complete.  I then took the seats off of the brackets and took them out back for a good scrubbing and let them dry in the sun for two days.  Put them back in and done.
 :clap2:

Next up will be seatbelts and I already have a plan there too.  I can't wait to take the kids out, they've been excited to go for months now but getting time to wrench is a challenge!

Cheers 

CB


floorrunner

  • Offline Rock Master
  • ***
  • Turtle Points: 333
  • Male Posts: 304
  • Member since Jun '09
  • Common sense is not that common...
    • View Profile
    • Buy me a soda
Just started this swap on mine but need to head to the junk yard for the top half hardware. Also on ur lower seats, did u get the latch to work? In other words Does it lock into the body near the seat belts or is it just hinged in the front?
87 4runner, 97 3RZ, dual ultimates, 5.29's air over elocker & arb, true longs R.I.P., York belt driven onboard air and a/c.

cbeers [OP]

  • Offline Rock Master
  • ***
  • Turtle Points: 4347
  • Posts: 309
  • Member since Jan '14
  • Crawling with Marlin
    • View Profile
I only have mine bolted on the front of the lower seats.  There is a provision for a latch but either I didn't get it from the 4runner I got the seats out of or it wasn't there.  The only thing I can think of as an issue is they MIGHT somehow flop forward in a sudden stop?  If there was a person in them, the seat belt would hold them in place.  Seatbelts are mandatory in my rig ;)

If you figure out how to make it latch please post up on this thread.  That would be a great detail to add.


Also, anyone out there want the old seat set up?  Seat itself, bracket for mounting etc.  Otherwise I will cut up the bracket for scrap (and practice with the torch!) and dump the seat.

Local only - Petaluma CA

CB


86yoter

  • Offline Rock Master
  • ***
  • Turtle Points: -18
  • Male Posts: 314
  • Member since Mar '12
  • and the work continues
    • View Profile
    • 86' runner build
    • Buy me a beer
Nice write up was there any measurements of your bracket you made.  This is something I might try out
86' runner nothing special

cbeers [OP]

  • Offline Rock Master
  • ***
  • Turtle Points: 4347
  • Posts: 309
  • Member since Jan '14
  • Crawling with Marlin
    • View Profile
Hey thanks, I was starting to think I shouldn't have even posted, too easy of a "project" but when I was trying to figure it out I couldn't find much.

I didn't take measurements but I have the first sets still at home so I can take them from that and post back up.  I'll try to remember to do that tonight unless you know who gets in the way    :beer:

 :beerchug:

CB


cbeers [OP]

  • Offline Rock Master
  • ***
  • Turtle Points: 4347
  • Posts: 309
  • Member since Jan '14
  • Crawling with Marlin
    • View Profile
Ok here are some pics of the first set of brackets I made.  Same basic dimensions as the final set.

The only modification I made on the final set was to cut down the second smaller piece to avoid interference with the body mount.  In this pic, if you were to draw a line from the top left corner of the smaller piece (welded on top of the larger piece) to inside the bottom left corner by about 1/2" or so you'd be golden.  OR just pay attention when designing them to avoid being like me  :hammer:

(I just realized the brackets I originally posted shows the cut out part)

More hammers to the head  :hammer:   :hammer:

CB


« Last Edit: Jul 01, 2014, 10:30:43 AM by cbeers »

Maui86

  • Offline Dusty Trails
  • *
  • Turtle Points: 0
  • Posts: 3
  • Member since Feb '23
  • Crawling with Marlin
    • View Profile
I'd be willing to buy some of those brackets if you have more.

Maui86

  • Offline Dusty Trails
  • *
  • Turtle Points: 0
  • Posts: 3
  • Member since Feb '23
  • Crawling with Marlin
    • View Profile
Anybody?

OVRAROK

  • Offline Silver Turtle Award
  • *
  • Turtle Points: 26852
  • Male Posts: 3,506
  • Member since Dec '10
    • View Profile
Anybody?

If you know dimensions. I can easily build and send. I have a rear seat delete. So I don't have any of the stuff( seats, brackets) to figure out
Even the most primitive society, has an intimate respect for the insane.

cbeers [OP]

  • Offline Rock Master
  • ***
  • Turtle Points: 4347
  • Posts: 309
  • Member since Jan '14
  • Crawling with Marlin
    • View Profile
if you scroll dimensions are shown above  :psss:

Marlon I'll be in touch this week. the weekend got away from me
 :beerchug:

CB

cbeers [OP]

  • Offline Rock Master
  • ***
  • Turtle Points: 4347
  • Posts: 309
  • Member since Jan '14
  • Crawling with Marlin
    • View Profile
Marlon check your PMs.  I can swing by with the rear seats today/tonight if you are around.

CB


Related Topics

2 Replies
1717 Views
Last post Dec 15, 2003, 02:19:36 PM
by carlos4x4sand
11 Replies
3430 Views
Last post Jan 11, 2005, 01:43:44 AM
by TrackVino
2 Replies
1340 Views
Last post Apr 18, 2006, 05:51:53 PM
by RCKSQRL
20 Replies
4779 Views
Last post Apr 14, 2009, 05:25:29 PM
by BLACKDOG
4 Replies
1226 Views
Last post Oct 08, 2013, 08:59:07 PM
by Rockdad